Monday, April 25, 2011

Photography Tips From One Tightwad To Another

Some great tips here

Photography Tips From One Tightwad To Another: "

Y’all know that I love photography, right? I’m not a professional by any means, but I really enjoy taking pictures, editing them and then sharing them with you! I’ve had some questions about photography over the last few months, so I thought I’d write my favorite, frugal tips into a post for you. Fun, right?!?!


I started out experimenting with photography with my point and shoot. There are SO many different things you can do with a point and shoot. If that is what you have and can afford then use it to it’s highest potential.


  • Start by reading your owner’s manual

  • Turn off the flash and use natural light

  • Experiment with different settings

  • Have fun with it!


I’ve learned so much from other bloggers about how to take great photographs. Darcy wrote an amazing series called 31 Days To A Better Photo and Kate wrote a great post on Better, Brighter Blog Photos then she hosted a few awesome bloggers who compared different aspects of photography.


Read all those posts and you’ll be a photography superstar! :)


I have three favorite photo editing programs. Remember I’m a tightwad…so all these programs are free!


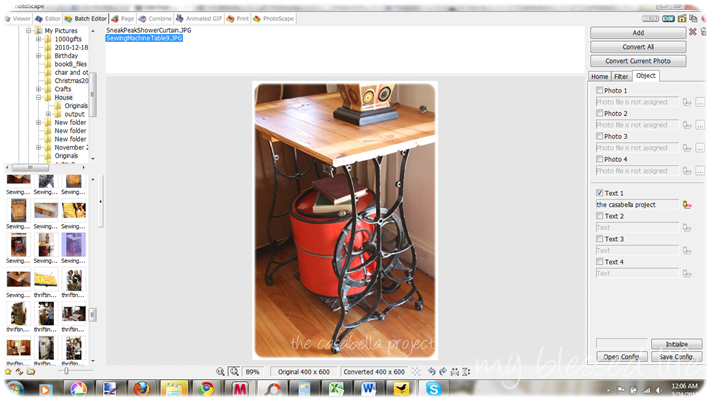
  • Photoscape - I love this program. It’s so easy to edit photos and even batch edit. I can watermark my photos and resize them all with the click of a button. Awesomesauce!


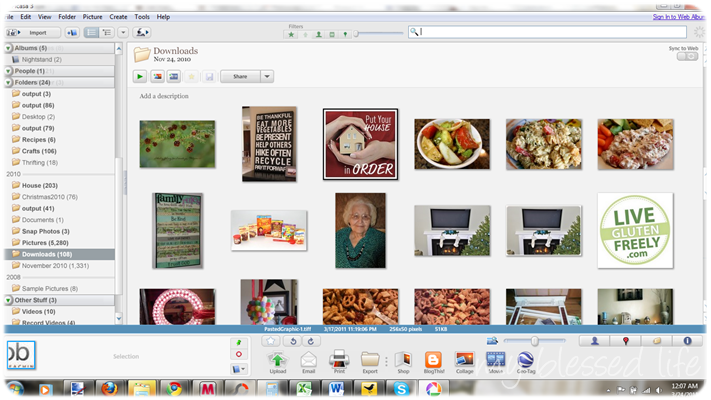
  • Picasa – I used Picasa when I first started photo editing a few years ago. My favorite Picasa feature is the collage feature. It’s so easy to use!


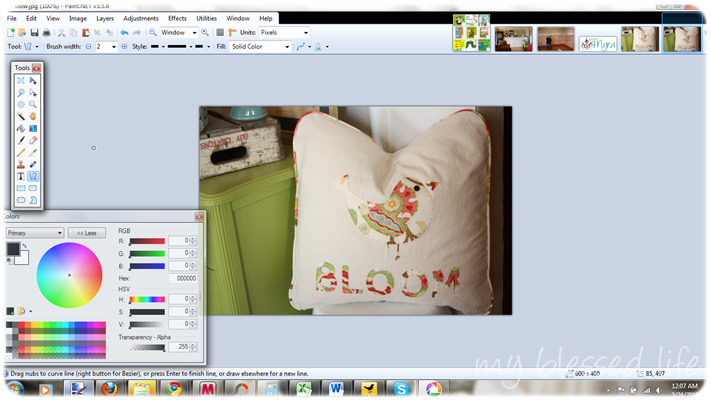
  • Paint.net – This, my friends, is Photoshop for tightwads. I haven’t shelled out big bucks yet for Photoshop, but someday I would love to have it. For now, Paint.net is a wonderful program where you can edit {touch up} photos, create graphics and much more.


Friday, April 22, 2011

Cleaning Calendar

Check out this cool thing, this will help me accomplish one or two of the things on my 101 in 1001 (2) list.

Family Snowman Portraits

Family Snowman Portraits: "


These Family Snowman Portraits are the Christmas project currently being done by Grade 2.


I found a great deal on these primed canvases at Michaels last week, 10 for $14.99. I think they are on sale this week for $19.99 which is still only $2.00 per child. You can also find them at the dollar store.

You could also just do them on paper suitable for framing by the parents.


Draw in a horizon line in pencil. After experimenting with the sample pieces I would make my horizon a little lower than the one in this picture.


Paint with acrylic in a nice sky blue. Make sure to paint the edges as well.


Let dry.


While your canvas is drying cut out some circles from foam or sponge.

You need at least 3 circles, small, medium, and large. I have some kids with large families so I will be cutting some long oval shaped ones so we can fit more snowmen on our pictures.


Taking gesso or thick acrylic paint (from the tub, tube, or a Folk Art Artist's Pigment brand) pounce in some snow on your bottom section. You want to have some texture here.


Mix in a little bit of the blue and add a few touches...this helps distinguish the ground from the snowmen a bit.


You can also add some snow glitter if you want. I added mine before my Mod podge coat and it was still shiny after. You could also wait and add it into the Mod podge if you prefer.


Now using your sponges put in your snowman family...1 for each member.

Now you can line these up in any order....you can also put the Mom on one end and the Dad on the other with the kids in the middle.


Using colored paper add hats, mitts, ear muffs, scarves, buttons, eyes and noses. A hole punch works well for the eyes and buttons.

Using sharpies you can add arms and smiles. Make sure to add your smile first and then glue your carrot noses in place. (works better this way).

Glue into place with tacky glue.


I used my cricut for the letters. My original plan was to stamp them in with paint but this was too tricky. You could print some off the computer and cut into equal squares like tiles..that would also look nice. You could also add "the" if you wanted (The Bartels)...we won't have the room on our canvases.
after thinking about it I've reconsidered and we will add a small 'The' and a little 's'.
I glued them into place and then covered it with a coat of mod podge...this secures all the paper bits and gives it a really nice shine.


This is my second sample. Here I placed the snowmen higher up on the snow so you can see the full circle of the body...I like this better.

Another finishing detail we are going to do is add some little pompoms and make some of the hats or mitts in felt. They will be attached after the Mod podge coat has dried. This will add a little 3D touch.

See you next time.
"

Project 333: 5 Wardrobe Pieces That Can be Worn 5 or More Ways

I LOVE THE FIRST TWO ITEMS IN PARTICULAR, SO GLAD SHE POSTED THIS! go see what can be done

Project 333: 5 Wardrobe Pieces That Can be Worn 5 or More Ways: "

When planning my Project 333 wardrobe, I carefully considered each garment and how well it plays with others. A shirt that only matches one skirt has no place in a streamlined, minimalist wardrobe, whereas a more versatile piece that coordinates with more items garners a higher spot on my list. Similarly, garments that could be worn in multiple ways gained a spot over those that only had one option. A number of clever designs are on the market now, and you might find one will fit neatly into your 33 garments and add fun and variety to your outfits. Here are 5 pieces that can each be worn in at least 5 ways.


To see the rest of this post, visit The Project 333, where it is the guest post of the day.


Did I Mention

Did I mention that when I planted my seeds for the garden this year that I marked them very poorly and only know for sure what two of them are?


Well, look what I found while googling the net. . .http://theseedsite.co.uk/seedlings.html.  This site has images of seedlings identifying what they are!  I gotta go get my marking sticks and get to work.  Gotta love search engines.

Seven At A Time

  1. My 12 year old son still wants us to hide Easter eggs for him and we are to "make it good", meaning hide them well.  I love it and him.
  2. Had a great visit with my older son this week.  It was really nice as it was just he and I, that rarely happens.
  3. My seedlings are doing soooo well, I can't wait to get them into the ground and see what happens.  I did flowers as well as vegetables this year.
  4. I have felt fairly well for four days in a row now.  I have hypothyroidism and it has been kicking my butt now for months  For information see .http://www.ncbi.nlm.nih.gov/pubmedhealth/PMH0001393/
  5. Had a decent workout last night.  I love going to the gym with the family.  It was not very crowded at all either which was nice.  I taught my 12 year old how to do bicep curls.
  6. I have nothing to wear and I hate shopping for clothes at the size I am now.  
  7. I am more than half way through the Inspector Frost series via NetFlix (love, love, love NetFlix).

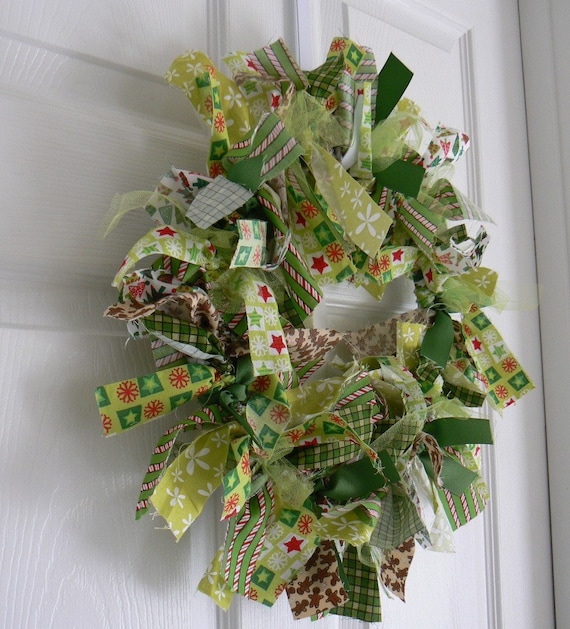
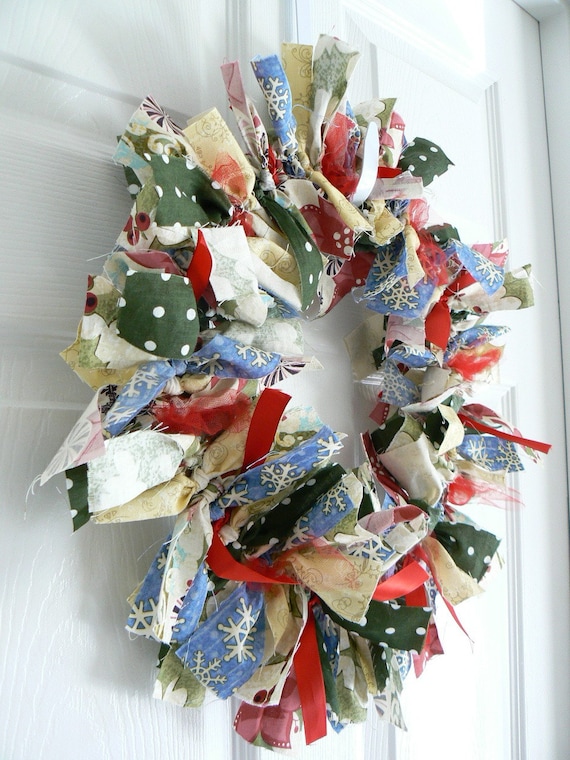
    Christmas Rag Wreath – Christmas Idea #14

    TOO CUTE AND IT LOOKS EASY AND SHE SELLS THEM IN HER ETSY SHOP

    Christmas Rag Wreath – Christmas Idea #14: "
    The sugar cookies are made! We made peanut butter blossoms and sugar cookies today. Tonight we are having my brother and sister over to finish decorating them. Ever since I moved out of my parents they have come over to decorate/make cookies. I’ll share pictures tomorrow!
    If you are new to my blog – WELCOME! If you are a veteran – THANK YOU! Whichever you are – new or old – Thanks for following along!
    Now – you may (or may not) remember the rag wreath I made for Halloween. I have made many more since then and what better time to make a wreath than Christmas? If you missed the how-to then go HERE.
    Mini  Christmas Fabric Rag Wreath - 6 inches
    Christmas SALE - Christmas Fabric Rag Wreath - 12 inches
    Christmas SALE - Christmas Fabric Rag Wreath - 12 inches
    Christmas Fabric Rag Wreath - 12 inches
    Christmas Fabric Rag Wreath - 12 inches

    "

    Random Friday Favorites

    I WANT TO REMEMBER THE SMART PHONE APP IN #2

    Random Friday Favorites: "
    Today on Favorite Friday I am showing you one of my new favorite websites, a phone app, a workout, and an Etsy shop!!
    #1 - Pinterest is a website that has already sucked a couple hours from my life (even though I just joined a week or so ago). It is a way to bookmark pictures. I love it because I can bookmark craft ideas from other blogs and easily find them without having to go through text links I have saved to my favorites. The site even allows you to categorize your pictures. So far I have focused on Easter and party ideas!
    You can follow my pins HERE!

    #2 – Mike and I took the plunge and bought smart phones – we each got a Droid X. (I guess they are real smart because between then and now my email got hacked and a couple hundred emails were sent to people on my contact list.)
    Anyways, I downloaded an app called My Fitness and it is great! In my venture to loose a few pounds before swimsuit season I got the app and use it almost everyday to keep track of my calories and workouts. When you first use the app it ask for your current weight, height, and activity level. Then you tell it your goal weight and it calculates the number of calories you should eat per day to achieve your goal. I haven’t really been extreme about it – but I have lost a couple of pounds and it really makes you realize what you consume each day!
    Wait – I almost forgot the coolest part! You can scan barcodes on your food items and it will automatically populate the calories and other nutritional information for the item. Super cool!
    imagesCAXYCB1N


    "

    Balsamic-Baked Onions and Potatoes with Roast Pork on the Food Network

    MAN THIS SOUNDS GOOD!

    Balsamic-Baked Onions and Potatoes with Roast Pork on the Food Network


    Thursday, April 21, 2011

    Meet Me On Monday


    1.  Caesar Salad or Garden Salad?


    I love them both, however, typically I order a garden salad.


    2.  Will you be watching the Royal Wedding on April 29th?


    No, I won't.  I watched Prince William's parents marry, however I would rather sleep in and watch all the news reports of the highlights, etc.  I do wish them the very best.  It would appear that they have done it right, in that they have really gotten to know each other and are the same age.

    3.  Last thing you spent lots of money on?


    Our Acura RDX and new windows for the top floor of the house.  


    4.  Window seat or aisle seat?


    Aisle seat

    5.  Do you know your blood type?


    Not by heart, but the card is in my wallet!

    Frugal Househould Tips

    Repost from Amanda's Money Saving Tips For The Home

    Frugal Househould Tips: "

    There are so many frugal tips out there – it would take forever to compile all the ideas and suggestions into one place. I’ve tried many, but there are only a few that have stuck. A few that I thought was worth the extra time involved. Because time is money.

    So I will share with you those frugal tips that we have been doing for quite awhile and works for me and the ones that we will likely continue.

    Of course some of these tips could be completely eradicated by going “paperless.” But truth be told, I just like paper towels and swiffer cloths. I like paper plates and napkins. So for now, we’ll try to save money in other ways.

    Swiffer Cloths


    • Re-use your Swiffer cloth – We use one cloth to dust and to sweep the floors. After we dust, the cloth goes back under the kitchen sink until I need to swiffer the floor. We rarely use a new cloth to do the floors.
    • Wait to clean up the “pile” – When you are done swiffering, rather than clean up your pile right away, store your swiffer and it’s pile in a little used, little seen corner. Then when there is a quick mess to swiffer up or you need to clean up after a meal, it will be ready to go and you’ll get more from the cloth. Some people can’t do this for various reasons, such as a pet or baby who wants to eat the “pile” or people who don’t have a secret place to store your swiffer pile. I suppose you could clean your pile and still save your cloth, but I found it to be a messy process.
    • Make your own – We have homemade swiffer cloths to resort to when I am out of paper or when I want to shave some money off the grocery budget.

      You can make your own by using a swiffer cloth as a guide and cutting receiving blankets to the exact size. These make great back-ups. The only problem is they snag terribly when you hit an unknown wet spot in the floor. So be sure the floor is dry!

    Swiffer Wet Jet


    • Homemade cleaning fluid – Did you know you could re-use the bottle your Wet Jet uses!? You would have thought I had won the lottery when I discovered this.

      To refill the bottle: First, soak the Wet Jet bottle in boiling water for a few minutes. Then you’ll want to use a dish cloth to twist the cap off. Voila! Fill with the cleaning solution of your choice and reattach the lid!

      We use a cleaning solution of 1/2 vinegar and 1/2 water with 20 or so drops of GSE.

    Laundry Detergent


    • Buy off-brand – I know many people that make their own. And if it works for you, that’s great! It will save you some money for sure. But for me it was quite a hassle and I didn’t like the way it cleaned our clothes.

      I buy off brand detergent from our Dollar General store. Simple enough, huh? Then I spend a little extra money on stain treatments and only spend the extra money on treating clothes that have hard to get out stains. A bottle of stain remover lasts almost forever for us.

    Dryer Sheets


    • Cut your dryer sheets in 1/2 – I do this as soon as I open the box. I take a pair of heavy duty scissors and divide the sheets into 3 piles or so and cut, then I place them back in the box. Gets the job done and you get double your money back!

    Dishwasher Detgergent


    • Use lessAccording to the experts we have a tendency to use too much dishwasher detergent. Correct this little habit and I am certain you will notice a bottle can go a looooong way.

    Hand Soap


    • Use foaming soap dispensers – I have foaming hand dispensers in each bathroom and one in the kitchen. I have noticed that we use far less hand soap than we used to. Not aware that you’re going through the hand soap quickly? Then I suggest you follow your children and just watch them wash their hands. I was shocked to see how much hand soap our children pumped out!
    • Make your own foaming soap – Fill each foam soap dispenser with 1 inch of regular hand soap and fill the rest with water.

    Cleaning Solutions / Windex


    • Make your own – We use a cleaning solution of 1/ 2 vinegar and 1/2 water sometimes with 20 or so drops of GSE. We use this to clean our floors, the bathrooms and kitchen, windows and mirrors.

    Paper Towels


    • Buy select a size – That’s pretty self explanatory! I personally like Sparkle paper towels. They are cheaper than Bounty and they hold up well and leave almost no lint behind.
    • Store them elsewhere – Especially if you have children, you may want to make the paper towels less accessible than right beside the kitchen sink. I have often stopped my children and counted how many paper towels they pulled off just to dry their hands…let’s not go there ok? By making them less available hopefully you’ll use less!

    Creative Estates Conference Highlights

    "
    Tips from Becky Higgins about balancing motherhood and small business.

    - Prioritize the next day’s ToDo’s the night before. Hand write them.

    - Find your passion. Don’t pick it for the money.

    - Don’t check your email first thing in the morning.

    - Have one notebook for all your creative ideas. The second we take an idea and write it down, the more you allow more creative ideas to come in.

    - Begin with the end in mind. Don’t start something unless you know what you want to accomplish in the end.

    - Make your family #1. Do you want to be the mom with the picture drawn by your child of the back of your head staring at a computer screen?

    - Plan rewards to stay motivated. When the big thing is accomplished you need to recharge. Reboot. A fun trip or a pedicure whatever makes you and your family happy.

    - Take inventory on your social media time. Use it to connect, but don’t spend too much time.

    - Block out two chunks of time during the day that you know you will be online…and that’s it.

    - Take a break from social media and take a look at what the break did for you, evaluate it’s effects.

    - Have two sections in your bedside notebook for short term and long term goals. Along with your current ToDo list.

    - Emotionally- you cannot please everybody.

    - Practically- you can’t let other’s complaints affect you personally, because it will eat up your creativity. Hire someone to cover customer service for this reason.

    - Let the negativity go. Don’t take it personally.

    - Make spirituality the first thing of the day.

    - Not a day that goes by without telling your family that you love them. Schedule date nights. Talk with your spouse every night. Communicate!

    - Appreciate the ones that support you.


    "

    10 quick tips for a better photo

    10 quick tips for a better photo: "


    10 Quick Tips for a better photo


    1. Get in close to the subject to capture the fine details. Rather than using the zoom on your lens, you should physically move in close to your subject.

    2. Try different angles. This will change lighting, shadows, background, etc. The same subject and shooting environment can create completely different pictures.

    3. Get down on your subjects level. Works great with animals, children, flowers, etc.

    4. Depth of Field! This puts the emphasis on your subject and gives your photos a professional look. Learn your camera settings to create that cool blur effect.

    5. Pay attention to lighting. Experiment with backlit and side-lit approaches. You can use poster board and bed sheets to add or reflect light where you need it.

    6. Look for silhouettes. Shooting toward the sun may not work for family portraits, but you can create artistic shots with silhouettes and sun flares.

    7. Use your background to complement and enhance your subject. Poster board, wrapping paper, craft paper and bed sheets are just a few ways to mix and match your background.

    8. Rule of Thirds. This is another simple way to make your photos look more professional.

    9. For a good indoor photo at night, bounce your flash. Invest in an external flash that allows you to point the flash toward the ceiling. This purchase will pay for itself over and over.

    10. Take TONS of photos. Some of my favorite pictures are random, candid shots from everyday life.


    "

    Perfect Pantry

    Perfect Pantry:

    I see a trip to the Dollar Tree in my future. Great tip and it looks great.


    Nothing had a spot. Cleaners, pet products and tools were piled high and we could never find what we needed when we needed it. So I headed to The Dollar Store to pick up 15 of these:


    I love these baskets for three reasons:
    1) They were cheap
    2) The plastic makes for easy cleaning if anything spills or leaks
    3) It's easy to see the contents of each basket because of the holes

    Once I got everything organized into the baskets, I whipped up some labels. A few months ago I was gifted these awesome chalkboard tags from Leen The Graphics Queen for being a Facebook follower. I knew they'd be perfect for this project.


    I added her tags to scrapbook paper that I had at the house and attached them with white ribbon.


    If I ever need to change what's in one of the baskets, it's easy! All it takes is one wipe of a paper towel.

    And Voila... my organized pantry.


    Now everything has a spot.

    I
    "

    Behind Closet Door Storage

    Behind Closet Door Storage

    Closed

    Open


    Amazing

    Wednesday, April 20, 2011

    Sew Woodsy: Tutorial: Customized Magazine Holders

    Sew Woodsy: Tutorial: Customized Magazine Holders:

    More Mod Podge

    101 Ideas in 1001 day (Again)


    1. Move white ware and silver to kitchen to change out the look.
    2. Empty out basement closet and turn it into food storage area.
    3. Use the calender system I purchased, including printing the darn thing out.
    4. Register DS in May tennis tournament
    5. Copy tennis tournament info for Alex
    6. Continue search for Harmony House Symphony dinnerware in chartruese.
    7. Finish up DS religious ed for this year.
    8. Workout at JCC three times per week.
    9. Remove playroom border.
    10. Paint playroom.
    11. Knock out east wall in playroom for additional accessible storage.
    12. Insulate playroom
    13. Install carpet tiles in playroom.
    14. Plant SQF garden.
    15. Check out Pininterest
    16. Clean up blog
    17. Birthday card plan
    18. Buy a BlendTec
    19. Buy a dehydrator
    20. Buy a canner
    21. Get back to regular green smoothie use.
    22. Eat 1200 to 1500 calories only daily
    23. Scan loose paper
    24. Finish labels for fish tank plant fertilyzer
    25. Develop daily calendar, similar to Motivated Moms
    26. Daily bridge work
    27. Get health folder together so I alwas know my numbers
    28. Enter in calendar when next haircut is due, when next prescription needs to be filled and when to ask DS about eyesight
    29. Open bags of topsoil for second garden plot
    30. Pull weeds and turn soil in first garden spot
    31. Remind DH to brace first garden spot
    32. Figure out what to order as hostess gift for Stampin Up party
    33. When is mother day?
    34. Buy mom's easter gift for DS
    35. Fill eggs for DS
    36. Figure out goggle docs
    37. Develop a homecleaning list here on the blog so I don't forget what to clean
    38. Vacuum under sofa cushions
    39. Try a price list again


      homemade christmas - aunt bonnie's photo display.

      This is so cute, I want to make one (or more).  Would be a great gift to give.

      homemade christmas - aunt bonnie's photo display.:


      (Source: Me & My Scraps)


      "