Friday, March 25, 2011

Photography Tips From One Tightwad To Another

Photography Tips From One Tightwad To Another: "

Y’all know that I love photography, right? I’m not a professional by any means, but I really enjoy taking pictures, editing them and then sharing them with you! I’ve had some questions about photography over the last few months, so I thought I’d write my favorite, frugal tips into a post for you. Fun, right?!?!


I started out experimenting with photography with my point and shoot. There are SO many different things you can do with a point and shoot. If that is what you have and can afford then use it to it’s highest potential.


  • Start by reading your owner’s manual

  • Turn off the flash and use natural light

  • Experiment with different settings

  • Have fun with it!


I was amazed at how much I could do with my Canon Powershot camera!


Now, I’m using a Canon Rebel XSi and I love it. Truly. I’m dying to get another lens because I’m still using the lens that came with the camera. It works. Remember the “tightwad” word in this post’s title. Ahem.


I’ve learned so much from other bloggers about how to take great photographs. Darcy wrote an amazing series called 31 Days To A Better Photo and Kate wrote a great post on Better, Brighter Blog Photos then she hosted a few awesome bloggers who compared different aspects of photography.


Read all those posts and you’ll be a photography superstar! :)


I have three favorite photo editing programs. Remember I’m a tightwad…so all these programs are free!


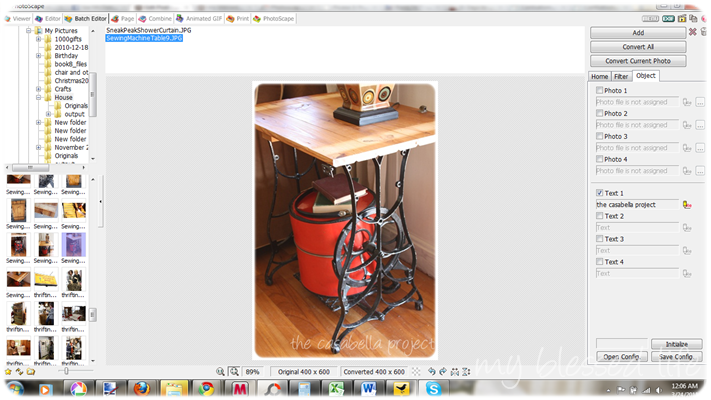
  • Photoscape - I love this program. It’s so easy to edit photos and even batch edit. I can watermark my photos and resize them all with the click of a button. Awesomesauce!


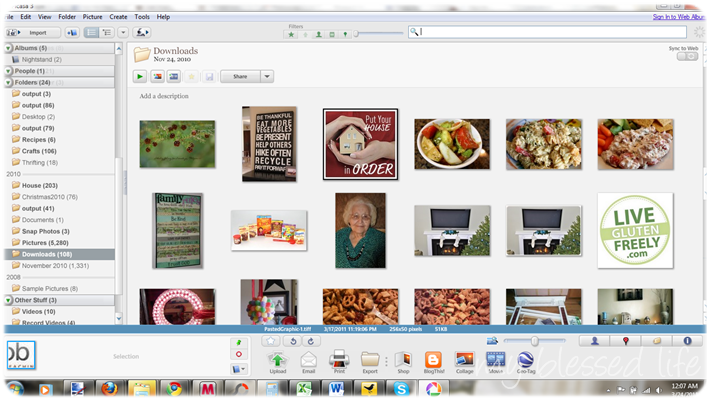
  • Picasa – I used Picasa when I first started photo editing a few years ago. My favorite Picasa feature is the collage feature. It’s so easy to use!


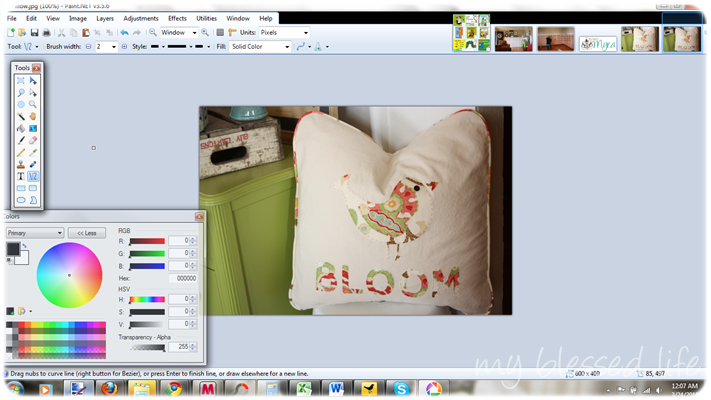
  • Paint.net – This, my friends, is Photoshop for tightwads. I haven’t shelled out big bucks yet for Photoshop, but someday I would love to have it. For now, Paint.net is a wonderful program where you can edit {touch up} photos, create graphics and much more.


So there you have it. My short list of photography tips, links and editing programs. Don’t feel intimidated or that you have to try everything. Find what works for you and go for it!


Now, I’d love to hear from you!


What kind of camera do you use? What program do you use to edit your pictures?


Linked to:


Related posts:

  1. Ten New Year’s Eve Party Tips


"

The Polished Pebble: The condo is done...at least for now!

The Polished Pebble: The condo is done...at least for now!

Hypothyroidism - Dr. Weil's Condition Care Guide

Hypothyroidism - Dr. Weil's Condition Care Guide

Best Thyroid Treatment? - Dr. Weil

Best Thyroid Treatment? - Dr. Weil

Broccoli Pancakes - Dr. Weil's Healthy Kitchen

Broccoli Pancakes - Dr. Weil's Healthy Kitchen

Wednesday, March 23, 2011

Risking It–Using Upholstery Fabric To Add Hot Spring Color to My Home

Now this is pretty.

Risking It–Using Upholstery Fabric To Add Hot Spring Color to My Home: "

So Long, Winter? The calendar says it’s Spring, but when I woke up this morning there was a layer of white stuff on the ground that wasn’t there yesterday.


I am trying to stay positive and I’m going chase the chill away by adding some Spring color to my family room by doing something a bit unconventional, but authentically in my own style –which brings me to how I even came happened upon my own style – my own way of doing things – a few words – I took a risk.


After-How-to-make-a-blanket


A long time ago when I was first married and my hubby and I had our first home I dearly wanted to decorate it, but we had a very teeny tiny budget. My younger, inexperienced self thought I had to go to Ethan Allen or JC Penney to decorate my home to have it look nice. I also had those worries – Will it look good if I do this? Will it go out of style before I can even get it paid off? or What if I hate it after I spend good money on it? etc. etc.


That all changed for me when I decided to just do it my way. I learned that when I wanted something bad enough –in this case a pretty home that I had to look past risks and find opportunity. My opportunity came when I threw the risks of picking and choosing conventional furnishings out the window and became resourceful – which I now know is one of my greatest strengths.


I started doing things my way – unconventionally – the way I learned in my profession of retail display. I used a glue gun to make drapes out of sheets and coat hangers to make curtain rods to hang them. This was way before HGTV came on the scene and a glue gun wasn’t a household staple. The way I was decorating my home caught on and I was doing it for my family, friends, and neighbors – unconventionally and everyone was so happy and wanted to know how to do it for themselves.


It was this unconventional way that I did things that landed me a DIY decorating book contract. I stood out from the crowd, I was doing something different – unconventional that worked and that people wanted – I was making a difference in people’s homes that had teeny tiny budgets like I did – and it all started when I took that first major leap and risked – doing it my way!


That leap and the belief that yes, I could make it happen set me on my course in life. My home was like a lab – where I took the risks – experimented! It was a fun and exciting journey. I have a bigger budget now a days, but still rely on my resources and doing things my way – unconventionally – it has more meaning to do it this way than for me to buy something off the rack – that to me is taking a risk – not authentic enough anymore for me.


So to chase the winter blues away I went to my favorite $1 a yard fabric place – JoMar and splurged! – I bought 3 yards of $6 upholstery fabric to make 2 bright and cheery throw blankets to replace my animal skin fur ones that I use in the winter.


Upholstery fabric is usually stiff and has strange backing – not very soft either, but I always keep my eyes open and never dismiss any possibility – cause that’s how I decorate my way. Most people would not even step into JoMar and if they did they don’t go down the rows and rows of aisles of the very ugly and old fabric that makes up a good portion of what JoMar sells. If I was one of these people, I would never have stumbled upon wonderful stuff like this upholstery fabric that was on the roll backwards and mixed in with the rows of dark brown fabrics. Stuff like this sells at Calico Corners for $36 or more a yard.


Supplies Needed:


Fabric

Thread

Scissors

Straight edge

1. Lay your fabric out – I always do this on my floor. I used my fur throw as a pattern. It measured 64” long x 46” wide.


How-to-use-uphostery-fabric


2. Use a straight edge and scissors to cut to size. I just cut length as the width of my fabric was perfect.


How-to-make-a-throw-blanket


3. To keep the corners from getting too thick when you sew a hem on each side, I first folded and pinned each corner down.


How-to-make-a-sofa-throw-1


4. Then turned over the raw edge on each side and sewed a hem.


How-to-make-a-blanket-throw


5. Then I repeated the process – by folding over the raw edged hem again to create a finished hem.


How-to-sew-the-corners-when


6. So I had finished edges and flat corners.


How-to-sew-corners-on-a-bla


All done and looking mighty spring-like on my chair.


After-Decorative-Throw-to-m


After-How-to-make-a-blanket


After-How-to-make-a-decorat


"

Mirrored Closet Doors


These are beautiful, especially when you see the original doors. What a difference!

Master Bedroom Re-do Update: Mirrored Closet Doors: "


Check out these marvelous mirrored doors!


"

Monday, March 21, 2011

Updated Pantry Basic: Homemade Ketchup With Honey

This post is from one of my new favorite blogs, An Oregon Cottage.  We are Heinz ketchup lovers and go through way too much of it.  In the event I decide to make our own ketchup I want to remember this one.  I didn't print it out as I don't want to

Updated Pantry Basic: Homemade Ketchup With Honey: "A Pantry Basic is anything we normally use and have in our pantries that most people buy from the store- and some (like me!) didn't even know could be made at home! See more pantry basics here.


Homemade ketchup was one of the first things I wrote about when I started blogging. I loved the ease of making our own ketchup and that I could control the ingredients and I was excited to share the recipe I used.

Now that I've been making it for more than three years, I thought I should share the updated version I make now that uses only honey as the sweetener (no processed sugars)- and uses a lot less. We still love it, and my kids continue to douse their food in it (teens and ketchup...) with no grumblings about any changes.

Here's my new updated recipe:

Homemade Honey Ketchup* (Printable Recipe)
  • 12 oz. tomato paste
  • 1/2 c. honey
  • 1 c. vinegar
  • 1/2 c. water (or more, for a thinner consistency)
  • 2 tsp. salt
  • 1/2 tsp. onion powder
  • 1/4 tsp. garlic powder
  1. Combine until smooth in a saucepan.
  2. Bring to a boil, reduce heat and simmer 20 minutes (you'll need to partially cover because it will spit hot tomato out at even the lowest simmer).
  3. Keep refrigerated. If it thickens too much in the fridge, just add some water (a couple teaspoons at a time) to reach pouring consistency.
  4. Makes 2-1/2 to 3 cups.
*This is doubled from the recipe I originally posted because this is the amount I always make and it fills our container. If you need less, cut everything down by 1/2. And yes, that would be only 1/4 cup of sweetener for the 1/2 batch- can you believe it? That's some good ketchup!

-Jami

Friday, March 18, 2011

A Millionish Uncommon (and Not So Uncommon) Uses for Coconut Oil

From CrunchyBetty

Heart-healthy, heart-warming coconut oil.

In the homemade toothpaste post, Karen from Abundance on a Dime posed a thoughtful question. “Is there anything coconut oil CAN’T do?” she asked.

And I thought, “Hm. It can’t drive me to the store to get more coconut oil. That’s maybe about it.”

So I combed through the Crunchy Betty archives for all the recipes I’ve posted using coconut oil, so we could see them all in one handy place.

But wait! That’s not all! THEN, I went crazy and did all the researching, tweeting, and general conversing I could about things to do with coconut oil. In return, we have this. The master list of things to do with the delicious, nutritious, and ever-so-helpful coconut oil.

If you figure out a way to get it to drive you to the store, let me know. I’ll add it in here.

The Master List of Things to Do With Coconut Oil


Effective DIY Coconut Oil Deodorant


It’s been months since I made my first batch of coconut oil deodorant – and I’ve made three more batches since then. To this day, homemade deodorant with coconut oil is the only thing I use. And I don’t even stink. Go, coconut!

Here’s the link to the entire post on how to make homemade deodorant. If you’re pressed for time, though, here’s a quick reminder of the recipe:

  • 1/4 c. baking soda
  • 1/4 c. cornstarch or arrowroot powder
  • 5 Tbsp. coconut oil
  • Essential oils (optional – I used 3 drops of ylang-ylang, 4 drops of sweet orange, and 2 drops of tea tree)


Coconut Oil Deep Conditioner


Every three weeks or so, I treat my hair to a deep conditioning coconut oil mask. It makes your hair delectably shiny and soft. Here’s how you do it:

When you have a couple of hours free before you have to shower, slather coconut oil all over your head and massage into your scalp. You can either leave it on as is, or wrap your head in a warm towel for extra deep conditioning. Leave this on for 30 minutes to 2 hours.

Wash your hair normally in the shower (it might take two shampoos to get all of the coconut oil out) and there shouldn’t be any need at all to condition. Just rinse and style normally.

Coconut Oil to Manage Frizz and Flyaways


Whenever you want to tame frizz or smooth and shine your hair, take a tiny (seriously, TINY, smaller than pea-sized) dab of coconut oil and rub it between your palms. You might not even be able to tell it’s on your hands – but it is. If you have curly hair, run your fingers through your hair and scrunch. If you have straight hair, just smooth over the top of your hair gently.

Coconut Oil For Dandruff


Because of its effective antibacterial and antifungal properties, coconut oil might just get rid of any dandruff problems you have. Simply massage coconut oil (with some added tea tree oil for extra oomph, if you’d like) well into your scalp for 5 minutes. Let it sit on your scalp for as long as you can, time permitting. Wash well.

Bonus: This may also work for babies who have cradle cap.

Coconut Oil for Athlete’s Foot and Odor Control


Stories litter the web about poor souls (soles?) who have suffered from recurrent athlete’s foot – and one common effective treatment seems to be coconut oil. Just rub the oil into your feet, concentrating on the affected areas (you can add some tea tree oil for extra benefit here, too). Put on socks for a while afterward (if you have hard floors, especially) so you don’t slide around the room. Repeat this two or three times a day until the athlete’s foot is gone.

Likewise, if odor is an issue, coconut oil has been known to freshen up the stinkiness with its antibacterial properties. Add a little lavender or lemon essential oil for extra deodorizing effect.

Preshave Treatment with Coconut Oil


You may be able to totally ditch your shaving cream by using coconut oil instead. The oil helps smooth hair follicles, leaving a closer, smoother shave. Apply all over the areas that need to be shaved before stepping into the shower, and then shave as normal.

One thing I wouldn’t recommend is using it as a “shaving cream” for the face, as it is comedogenic and could lead to pimples, if you (or your man is, anyway) are affected by breakouts.

Coconut Oil as a Full-Body Moisturizer


Coconut oil is, by far, my go-to after-bath moisturizer these days. Occasionally I’ll stir up some coconut oil with a few drops of essential oils, but most of the time I just pull it straight out of my “bathroom jar” of coconut oil. (I have many jars of coconut oil these days. This is the opposite of a complaint.)

While your skin is still wet after showering, smooth coconut oil all over your body and … poof. You’re a soft-skinned goddess.

If you want ultimate moisturizing, though, try stirring together equal parts coconut oil and olive oil and adding in a little jojoba. Drip in a few drops of rose or frankincense essential oil, and you’ve got a concoction no store-bought lotion could even come close to.

Coconut Oil in a Face Mask


Now, now. I know I’ve said that I’m not all that keen on using coconut oil on your face. With one caveat: If you have dry, flaky, or aging skin that doesn’t ever have issues with pimples or breakouts, coconut oil may be your ticket to soft moisture.

To this day, my favorite recipe for a coconut oil facial mask is the one I posted in the Easiest DIY Recipes from Around the Web: The Frozen Egg and Honey Facial Mask from Spa Index.

You freeze a mixture of egg, honey, and coconut oil in a bathroom tissue roll (sans the tissue) and then roll it over your face like a push-pop. Genius!

Coconut Oil as an Eye Makeup Remover


Better than any eye makeup remover I’ve ever bought in the store – just put a dab of coconut oil on a cotton ball and swipe over your eyes. The makeup – and mascara – just melts away. And it moisturizes the delicate skin around your eyes, to boot!

Coconut Oil as a Lip Balm


Not long ago, I posted the recipe for Coco-Rosey lip balm using coconut oil as one of the main ingredients. I’ve been using this lip balm nonstop since, and I can assure you, my lips have never been softer.

Here’s even better news, though: You don’t have to make a balm to get the moisturizing benefits of coconut oil. Just slather it, plain, on your lips. It makes for a superb gloss, too! VERY shiny (until it soaks into your skin).

Coconut Oil in Toothpaste


If you’re (really) new here, this may come as a surprise. So hop on over to the last blog post all about using coconut oil for homemade toothpaste.

It cleans your teeth (with its antibacterial and antiviral properties) and leaves your gums uber healthy, as well.

Coconut Oil as a Love Balm


It’s most important to point out that coconut oil is NOT latex friendly. So … you know the drill.

However, here’s a post with a recipe to use coconut oil as a love balm/body oil to get all cozy and smushy with your significant other.

Bonus use for it, too: You could slather the concoction all over your body and drape yourself (while lying in the tub) with very warm bath towels. Sit that way until the towels have cooled. What you have right there? A VERY luxurious full-body moisturizing mask.

Coconut Oil for Scratches and Scrapes


Coconut oil has incredible healing abilities, along with its antibacterial and antiviral properties. Slather a bit of coconut oil on a scratch, scrape or small cut and your wound may heal faster and resist infections in ways it wouldn’t have otherwise.

As a bonus, it may also help reduce the chances of scarring from these small abrasions.

Coconut Oil for Eczema


I posed the question to my Twitter friends: What ways do you use coconut oil? And almost immediately, Sandi (@knitmyrhino) said: “I use coconut oil on my eczema breakouts, they go away faster and it’s calming.”

She’s not the only one. According to EarthClinic users, it has worked very well for their eczema.

Coconut Oil for Acid Reflux and Ulcers


EarthClinic turned out to be, as it usually is, a boon of information – and I had no idea that coconut oil has been used by large numbers of people to treat things like acid reflux and ulcers.

The word is, taking two to three tablespoons of coconut oil a day (which you can put in coffee or tea if you can’t fathom eating straight coconut oil) has really helped a large number of people. As a result of reading this, I’ve started drinking 3 cups of tea daily, each with 1 Tbsp virgin coconut oil melted in it. Tastes delicious … and so far so good!

Want to know more about ALL the health issues coconut oil is used for? Here’s the master list of coconut oil treatments on EarthClinic.

Coconut Oil for Weight Loss


I’m hesitant to even put this one in here, because I feel like the claims have been just a tiny bit overhyped, as are most claims about some “magical ingredient” that causes you to shed pounds.

But, the fact is, there are studies that show regular ingestion of coconut oil can lead to small amounts of weight loss. So here you go.

Want to know how to take it? I’ve read that many people just eat a tablespoon straight from the jar, but I can’t make myself do that on a regular basis. Instead, I’ve started melting a tablespoon into my cup of coffee in the morning, along with two or three more cups of tea throughout the day.

Don’t just take it for weight loss, though – do it because it’s so very healthy and good for you. But most of all, do it because it’s yummy and makes your tummy SO happy.

Coconut Oil as a Sun Screen


Coconut oil has natural sunscreen abilities, and it would be a great addition to any homemade sunscreen you might want to whip up. To top it off, coconut oil also contains vitamins that protect your body against the damage that free radicals (as a result of sun exposure) may cause.

Coconut Oil Instead of Goo Gone


An entire hour I spent last night scouring my house for every glass product that still had a sticker on it. Why? Because getting it off was SO easy using coconut oil and baking soda.

Use this for any sticky, icky, gooey situation you might otherwise use Goo Gone on. Just mix equal parts coconut oil and baking soda into a paste. Apply to the “sticky” area and let it set for a minute. Then scrub off with an old toothbrush or the scrubby side of a sponge.

Coconut Oil to Polish Furniture


When the question of “What do you use coconut oil for?” was posed on Twitter, Jesilee (@WEFA_in_Me) told me that she uses coconut oil with a little bit of lemon juice to polish her wood furniture.

I did more digging and found that this is a great alternative to toxic polishes like Pledge. However, I recommend you test it first on a very small, unobtrusive part of your furniture to make sure it works the way you’d like.

Here’s how Jesilee does it: “I pour on a little bit of bottled lemon juice and rub the oil into that with a towel. Don’t do too much or it gets all over.

Coconut Oil for Polishing Bronze


If you’re fancy enough to have bronze statues hanging out in your home, try cleaning them with coconut oil. All you have to do is rub a little oil into a cotton towel and then wipe down the statue. It cleans and helps deepen the color of your art. Cool, huh?

Coconut Oil to Grease Muffin Tins and Pans


Next time you get ready to break out the Crisco or vegetable oil to grease your muffin tins or pans, reach for the coconut oil instead. It’s so much more heart healthy – and the taste is so light, you’ll never even know the difference.

Coconut Oil in Cooking


This one is no surprise, to be sure. Coconut oil has CRAZY amazing health benefits, and it tastes sooooo delicious in foods. For some reason, though, I’ve had a really difficult time implementing coconut oil in my cooking, so here’s a great start (for ALL of us) to utilize it for more than just beautifying the skin:


  • Coconut Oil Recipes from Epicurious – Who said coconut oil couldn’t be fancy shmancy? Look at how many results popped up when I searched for recipes containing the stuff.

  • Green Diva Mom gives her favorite coconut oil recipes – I love reading first-hand accounts of implementing coconut oil into cooking!

Sunday, March 13, 2011

The Last Chargers You'll Ever Buy

What A Simple, Clever Idea


Wanna know a great secret? I have the perfect charger that is inexpensive and will go with EVERY occasion. Try this!

A 12 inch by 12 inch piece of tempered clear glass with polished edges . . . sound boring? Consider this . . . it is the perfect size to fit over a piece of scrapbook paper. This means you can change out the scrapbook paper for any occasion.


You can purchase glass tiles at your local hardware store, but they do not have polished edges and are not tempered which can be a safety hazard. I purchase my polished, tempered glass squares from this online company, but there are others online as well. You might even consider having them cut at your local glass store, but mine wanted to charge me over $10 per square! Yikes!


"

Be Thankful Board

I think I could do this!

Be Thankful Board:
I hope you will all forgive me for starting to post Thanksgiving ideas. I know Halloween isn’t over, but I just love Thanksgiving and the message that we should stop and thank those around us for everything we have. I also love the food involved in this holiday too. :)

I wanted to make a small something that would help me remember to stop and think about being thankful. I loved Brooke’s canvas she made last year and wanted to try something like that. I decided on this Be Thankful wood board. I hope you enjoy.


You will need:

a wooden board

scrapbook paper

brown paint

Mod Podge

Vinyl lettering

Ribbon if desired (I ended up not using any ribbon)


Begin by painting your board. I just painted the outside edges and some of the front, but since I was going to cover it, why waste more time painting right?!?


Measure the front of the board and cut your paper to size. I made sure that my paper was just a smidgen smaller then the front cause I wanted some of the brown paint to show. Put some Mod Podge on your board and adhere your paper to the board.


Add your vinyl. I cut mine out with my Silhouette. Make it any saying that you want. I then took my sponge paintbrush and just brushed it up against the edged to give it that inked and smudge look. You can’t go wrong here. If you get too much paint in a spot just rub it with your finger and it will smudge it again. I wouldn’t dip your brush at all, just use what is left after painting the board.

Add a top coat of Mod Podge and there you have it. A beautiful board to remind you to be thankful.


Saturday, March 12, 2011

I :Like This Outfit

In Texas: "

Gap tank


DKNY watch


Gap belt


F21 bracelets


French Connection Jacket


Pitaya bracelet


Jenny Present necklace


Gap jeans


Get the look: jeans, jacket, tank, necklace, bracelets 1 2 3, watch, belt, earrings


So, you must know that I’m in Texas for the Texas Style Council Conference. Well, I’m sure I’m having an amazing time and I can’t wait to tell you all about it! But I didn’t want to leave you high and dry, so here are some pics that Bob took of me last week. I am loving these pants so much! I hope you like them too, because you’re gonna see a lot of them in the next few months.


So, how is your weekend going? Seen any good movies lately?


"

dirty little secret

dirty little secret:
"I work at a church cleaning at nights, the same time the carpet cleaning man works.  He has a 'secret concoction' that he's used to clean floors in school buildings.  I figure if it works for hundred of kids, it can work for my little carpet.  The best part of this concoction is that it is made of simply household ingredients!


What you need:
Rubbing Alcohol
Dawn Liquid Dish Soap
Spray Bottle
Rag (s) 

What to do:
Mix equal parts of rubbing alcohol and dish soap together in spray bottle 
Spray a mist on your dirty carpet and let set for about 30 seconds or so
Rub the soiled area with the rag
If your carpet is heavily soiled, like mine was, you may need to spray again and rub.  I did this about four or five times!  If your rag gets super filthy, get a new one...trying to clean with a dirty rag is not effective!
The cleaner dries pretty quickly, but will leave a light smell of alcohol.  I vacuumed the carpet after cleaning and it took a lot of the smell away.

50 Uses for Vinegar

50 Uses for Vinegar: "


I found this list of uses for vinegar on the internet…it is amazing how many things you can use vinegar for! I hope you find something you can use! For a listing of even MORE uses (1001 to be exact), click on this website: http://www.vinegartips.com


1. Kill grass on walks and driveways.


2. Kill weeds. Spray full strength on growth until plants have starved.


3. Increase soil acidity. In hard water: one gallon of tap water for watering rhododendrons, gardenias, or azaleas.


4. Deter ants. Spray vinegar around doors, appliances, and along other areas where ants are known.


5. Polish car chrome. Apply full strength.


6. Remove skunk odor from a dog. Rub fur with full strength vinegar; rinse.


7. Keep cats away. Sprinkle vinegar on areas you don’t want the cat walking, sleeping, or scratching on.


8. Keep dogs from scratching his ears. Use a clean, soft cloth dipped in diluted vinegar.


9. Keep chickens from pecking each other. Put a little in their drinking water.


10. Tenderize meat. Soak in vinegar over night.


11. Freshen vegetables. Soak wilted vegetables in 2 cups of water and a tablespoon of vinegar.


12. Boil better eggs. Add 2 tablespoons to water before boiling eggs. Keeps them from cracking.


13. Soothe a bee or jellyfish sting. Dot the irritation with vinegar and relieve itching.


14. Relieve sunburn. Lightly rub white vinegar; you may have to reapply.


15. Condition hair. Add a tablespoon of vinegar to dissolve sticky residue left by shampoo.


16. Relieve dry and itchy skin. Add 2 tablespoons to bath water.


17. Fight dandruff. After shampooing, rinse with vinegar and 2 cups of warm water.


18. Soothe a sore throat. Put a teaspoon of vinegar in a glass of water. Gargle and then swallow.


19. Treat sinus infections and chest colds. Add 1/4 cup or more vinegar to the vaporizer.


20. Feel good. A teaspoon of apple cider vinegar in a glass of water, with a bit of honey added for flavor, will take the edge off your appetite and give you an overall healthy feeling.


21. Deodorize the kitchen drain. Pour a cup down the drain once a week. Let stand 30 minutes and then flush with cold water.


22. Eliminate onion odor. Rub on your fingers before and after slicing.


23. Clean and disinfect wood cutting boards. Wipe with full strength vinegar.


24. Remove fruit stains from hands. Rub with vinegar.


25. Cut grease and odor on dishes. Add a tablespoon of vinegar to hot soapy water.


26. Clean a teapot. Boil a mixture of water and vinegar in the teapot. Wipe away the grime.


27. Freshen a lunchbox. Soak a piece of bread in vinegar and let it sit in the lunchbox over night.


28. Clean the refrigerator. Wash with a solution of equal parts water and vinegar.


29. Unclog a drain. Pour a handful of baking soda down the drain and add 1/2 cup of vinegar. Rinse with hot water.


30. Clean and deodorize the garbage disposal. Make vinegar ice cubes and feed them down the disposal. After grinding, run cold water through


31. Clean and deodorize jars. Rinse mayonnaise, peanut butter, and mustard jars with vinegar when empty.


32. Clean the dishwasher. Run a cup of vinegar through the whole cycle once a month to reduce soap build up on the inner mechanisms and on glassware.


33. Clean stainless steel. Wipe with a vinegar dampened cloth.


34. Clean china and fine glassware. Add a cup of vinegar to a sink of warm water. Gently dip the glass or china in the solution and let dry.


35. Get stains out of pots. Fill pot with a solution of 3 tablespoons of vinegar to a pint of water. Boil until stain loosens and can be washed away.


36. Clean the microwave. Boil a solution of 1/4 cup of vinegar and 1 cup of water in the microwave. Will loosen splattered on food and deodorize.


37. Dissolve rust from bolts and other metals. Soak in full strength vinegar.


38. Get rid of cooking smells. Let simmer a small pot of vinegar and water solution.


39. Unclog steam iron. Pour equal amounts of vinegar and water into the iron’s water chamber. Turn to steam and leave the iron on for 5 minutes in an upright position. Then unplug and allow to cool. Any loose particles should come out when you empty the water.


40. Clean a scorched iron plate. Heat equal parts vinegar and salt in a small pan. Rub solution on the cooled iron surface to remove dark or burned stains.


41. Get rid of lint in clothes. Add 1/2 cup of vinegar to the rinse cycle.


42. Keep colors from running. Immerse clothes in full strength vinegar before washing.


43. Freshen up the washing machine. Periodically, pour a cup of vinegar in the machine and let in run through a regular cycle (no clothes added). Will dissolve soap residue.


44. Brighten fabric colors. Add a 1/2 cup vinegar to the rinse cycle.


45. Take grease off suede. Dip a toothbrush in vinegar and gently brush over grease spot.


46. Remove tough stains. Gently rub on fruit, jam, mustard, coffee, tea. Then wash as usual.


47. Get smoke smell out of clothes. Add a cup of vinegar to a bath tub of hot water. Hang clothes above the steam.


48. Remove decals. Brush with a couple coats of vinegar. Allow to soak in. Wash off.


49. Clean eyeglasses. Wipe each lens with a drop of vinegar.


50. Freshen cut flowers. Add 2 tablespoons vinegar and 1 teaspoon sugar for each quart of water.


:::::::::::::::::::::::::

Friends, A free gift just for you...to bless you as you serve the Lord and your families. Click here to download your free copy of Hints on Child Training by H.C. Trumbull (Kindle Edition).

These 'gifts' will change from time to time!

To share with others, please direct them to Graham Family Ministries to subscribe. Thank you!

:::::::::::::::::::::::::

Gifts...Would you consider giving the gift of hope to a child today? Click here to sponsor a child through Compassion today!.

:::::::::::::::::::::::::

Related posts:

"