I like this idea.
Sunday, October 31, 2010
It's a Daisy Day!: Super Fast Phone Book Luminaries
I think my son would enjoy helping me make these.
It's a Daisy Day!: Super Fast Phone Book Luminaries

It's a Daisy Day!: Super Fast Phone Book Luminaries

Black and White {Side by Side}
Traveling Lightly Through Life | zen habits
Hometown Girl: Fall Leaves Wreath.
Labels:
fall decorating,
Hometown Girl,
wreaths
Tuesday, October 26, 2010
Sweet Bee Buzzings: Knitting with Grandma: Dishcloths
Sweet Bee Buzzings: Knitting with Grandma: Dishcloths
This is the washcloth grandma used to make, after all this time, I have the pattern!!! Now to relearn how to knit. :)


Monday, October 25, 2010
Lifestyle of Learning – Foreign Language {and a Giveaway!}
Lifestyle of Learning – Foreign Language {and a Giveaway!} This looks like a great product.
Gorgeous Makeover
There is just something about black paint, I could see this arrangment in several rooms in our home.
The little table was just a lbj (little brown job) , that I got for $6.00 at Goodwill.
Everyday Expressions: Super Cute Halloween Coasters!
Everyday Expressions: Super Cute Halloween Coasters!
I love the way these look, add to my list of projects!


Sunday, October 24, 2010
Shanty2Chic: Ashley's White Pumpkin Bandwagon!
Shanty2Chic: Ashley's White Pumpkin Bandwagon! I like these, cheap spray paint, twine and ugly fake pumpkins.
Saturday, October 23, 2010
I've Seen These Around
I started with this $8 mirror from Target. I thought it would work perfectly because it had a small lip all the way around the edge.
I attached some bbq skewers ($0.98 for 100 at Walmart) to the outer lip using my trusty hot glue gun.
looks a little scary like some sort of weapon....
Puffy Paint Pumpkins = Not As Cheesy As It Sounds | Young House Love
Puffy Paint Pumpkins = Not As Cheesy As It Sounds | Young House Love These are way cute. See younghouselove link for full post.


Simple Necklece Holder
Labels:
alamode,
easy craft,
jewelry storage
Party Favor for Tennis Lover
Roeshel’s Tennis Party Favors Thought I'd link up with this idea in the event I throw DS a party anytime soon. Pretty simple and clever.

The full tutorial is at thediyclublink above.

The full tutorial is at thediyclublink above.
Thursday, October 21, 2010
Full of Great Ideas: Floral Wire Pumpkins for $1
Full of Great Ideas: Floral Wire Pumpkins for $1 Cute, inexpensive and relatively easy craft that was inspired
by a rattan pumpkin from Pottery Barn
.
by a rattan pumpkin from Pottery Barn
.

Homemade Mamas: Super Charged Oatmeal
Homemade Mamas: Super Charged Oatmeal This looks good enough to try. It contains oatmeal, flax seed, wheatgerm and quinoa all things I have on hand and all are healthy for you.
Never Thought Of. . .

Using pinecones under the plant, I could do this on my front porch. I was thinking just today that it was looking kind of undone. Check out The Inspired Nest link for the rest of her ideas. She has a beautiful front porch.
A Glimpse Inside: Pumpkin Yarn Art Tutorial
A Glimpse Inside: Pumpkin Yarn Art Tutorial this project is so darn cute with a great tutorial.
This is what it looks like
This is what it looks like

InkspiredTreasures Idea
I've seen lots of uses for the owe punch and this one is really cute and so simple.
.jpg)
.jpg)
I started by creating the box with Pumpkin Pie cardstock. Then I stamped the bats from Wicked Cool diagonally across the front of Basic Gray layer…I also stamped them diagonally across the back of the Pumpkin Pie holder (not shown). I punched the moon with the 2 1/2 Circle Punch from So Saffron and used a sponge dauber along the edges with Tangerine Tango Ink. The Owl silhouette was punched from Basic Black, along with the branch from the Two Step Bird Punch. I stamped Spooky on Pumpkin Pie cardstock with Basic Black ink and punched with the Large Oval Punch. I have a Mini Library Clip "holding" it (I really adhered it so it wasn't lost.)
This Girl is Seriously Crafty
I saw some blocks similar to this at Roberts for 24.99 mine were FREE! (I used scrap 2x4's and cream paper, then mod podged the letters on the painted blocks!)

More wood blocks covered in scrapbook paper. We cut the letters out with a cricut.

This one I just put the red paper in the printer and printed the words right on! Then mod podge the paper to a chunk of painted wood!

Clever, Clever Lady
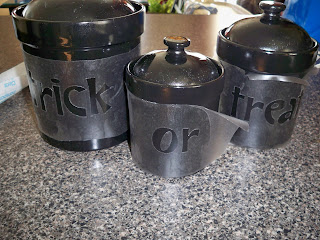
Maria "found some pretty good treasures! I over looked these canisters several times, and just as we were leaving, inspiration hit - "I can spray paint those!" (I know - shocking it took me that long!)
So here are the beauties before:

I debated back and forth whether to paint them orange and make them Jack-O-Lanterns, or Black with "B-O-O" or black with "trick-or-treat" I finally decided on the trick-or-treat.
First they needed a good bath in the dishwasher, then I pulled out my trusted can of spray paint (high gloss black) After about 2 coats, they were ready. Kinda forgot to get a pic of them all black - oh well, you get the idea

I have the program Sure Cuts Alot (thanks to my sister Annie) and so I just typed the words into that program, plugged my cricut into my computer with my printer cable, and pressed cut - that easy!

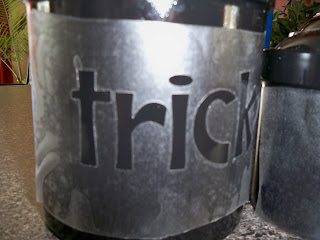
Oh - I decided to spray paint the letters instead of using vinyl. So I cut the words out on Contact paper and used it as a stencil.


I very carefully pealed away the paper, and adhered the contact paper to my canisters, pressing firmly and pushing out all the bubbles.


Now the fun part - Spray Paint! (this time I used my leftover appliance enamel from painting my KitchenAid)

After a long wait, I finally pealed back the contact paper.
Final results:
Bats, Bats, Bats
BATS
A $1 Project
 This very inexpensive project couldn't be easier. I got the inspirations from a picture I saw in the Country LivingMagazine. Mine is not as substantial or outdoors, but for our small apartment, it does the trick. Older children that can use scissors can even help out with this project! It took about an hour to complete from start to finish. All I did was purchase two large, black poster boards from the Dollar store(.50 cents ea.) This entire project was only $1!!!!! I drew and cut out a bat and used that as a stencil to trace on several bats to my poster board. Then just start cutting!
 My little collection of bats growing as I watched Sports Nation...Yep! I watch Sports Nation :)
Labels:
Halloween,
johnsonfamily23,
under $5
Guess What We Are Having For Dinner
Easiest Mac and Cheese Ever!
World's Easiest Macaroni and Cheese!
- 1 (16 ounce) container cottage cheese
- 16 ounces of uncooked elbow macaroni
- 16 ounces water
- 16 ounces shredded cheddar cheese
Labels:
GroceryCartChallenge,
Pasta,
recipes
Gorgeous
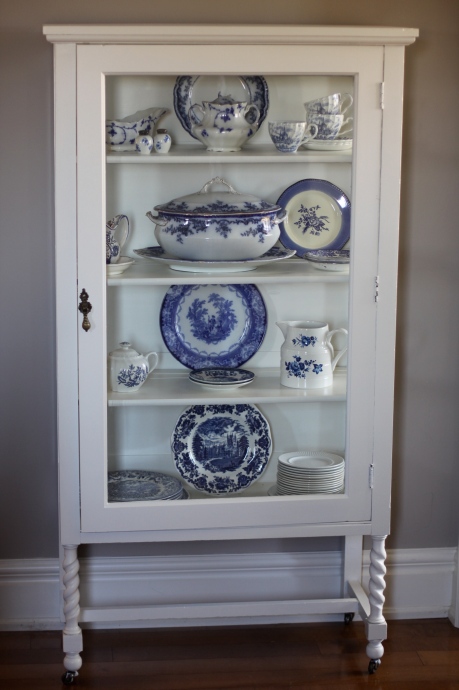
I found the following entry entitled "Highway Robbery" and fell in love with the beautiful cabinet the entry was about. Would love to find something like this myself. To see the original item and to read the entire entry go to Highway Robbery.
"I finally decided on Sherwin Williams Creamy White. It’s not sexy, but I just wanted a simple color that wasn’t a passing fad and that would coordinate with anything I decided to display in it.
I didn’t distress it. I didn’t glaze it. I didn’t touch the original hardware. I straight-up painted it and I like it. 
It’s perfect for displaying my blue and white pieces. Fun fact for ya…every piece in this cabinet with the exception of one small pitcher came from garage sales and thrift stores. I love that none of it matches, but coordinates beautifully."
Post on Rosary
I found this entry at the Snoring Scholar on October 21, 2010. It is an essay written by Jane Lebak and as a non rosary praying Catholic, it gives me a great idea on how to develop the habit and is a beautiful testimony on what can happen when you ask.
 One of the Marian promises addresses “faithful children of the rosary,” but I consider myself an unfaithful child. I first took up the rosary on my subway commute to high school, and I continued whenever I had a job that required a trip into Manhattan.
In 2006, I asked my guardian angel to help me find time for the rosary every day. I figured the angel wouldn’t mind helping me with prayer, and I guess I was right because every day since then, if I haven’t prayed already, I’ll find myself alerted when I have twenty undisturbed minutes coming up. (We won’t talk about the one time I got awakened out of a sound sleep to pray at 11:15 PM.)
During that year, a friend gave me a Lourdes rosary with a mother-of-pearl sheen to the beads. I had it blessed, and I put that rosary in rotation with my others.
Before the end of that year, God inverted my life like a dirty sock.To my own surprise, I responded to the crisis by needing–no, by craving–that daily rosary. Left frightened and small, I began carrying the pearly blessed rosary everywhere. When I hurt, I’d touch it in my back pocket. At night, I kept the rosary in my pajama pocket or sometimes slept with it in my hand.
At one point, a friend mentioned that she wanted to start saying the rosary, and without thinking, I pulled out my rosary and showed her. She said later that because I loved it, she found her own beads and downloaded instructions on how to pray it.
After a month of carrying my rosary everywhere, I began finding pearly flakes on my hands. To my distress, the pearl was only a coating over plain white plastic. Every day, I’d finish the rosary with less pearl, more plastic. Sometimes the paint would peel off a bead all at once, as if it molted.
I showed a friend from church, who exclaimed, “It’s beautiful!” I showed her how it looked ugly where the paint was peeling. She said, “At least that means you’re using it, right?”
I said I guessed so, but only because I had no strength to argue.
One afternoon, as I sat by my window praying, one of the beads lost its paint, and I had this sense of despair, how something pretty was turning ugly because I touched it.
A moment later, I felt reassured by the Holy Spirit: that the rosary, through rough treatment, was losing the fake outside, and what would remain was truly its essence. The same way, through this difficult time, I too was losing the fake outer parts of myself, and what remained when God was done would be the real me, the me God wanted.
The crisis has passed. I’m still praying the rosary every day. And my once-pearly is all white now, bright and clean, pretty in a different way–beautiful the way it should be.
Labels:
Catholic,
Prayer,
Rosary,
Snoring Scholar
Subscribe to:
Comments (Atom)

.JPG)


